Awesome Followers

Friday, November 30, 2012

MCCR 100 Cricut Cartridge Blog Hop


Welcome to Erica's Craft Room
100 Cricut Cartridge Blog Hop 
You should have started at http://mycricutcraftroom.blogspot.com/ 
if not please start at the beginning.
If you arrived from Erica's Projects then you are in the right place. 
Collectively the Design Team with My Cricut Craft Room uses over 100 Cricut Cartridges in their projects during this hop. 

 These two index books I made using Plantin SchoolBook for the letters and Everyday Paper Dolls for the animals. The letters cut at 2 1/2 inches and the animals at 3 inches. 
 
 
 I cut this gingerbread man from Stretch Your Imagination at 3 inches.  
 
 For this candy bar wrapper I cut the green & white label from Lacy Labels at 3 inches. 
The wreath I cut from Christmas Cheer at 2 1/2 inches and added Stickles. 

Next head on over to Robin's 


Thursday, November 29, 2012

Inspired Stamps Bottle Cap Magnets

Today I am going to show you how to make some bottle cap magnets that I am working on as gifts.
The supplies you need are paper, bottle caps, Glossy Accents, 1 inch circle punch and 1 inch stamps.
Step 1- stamp your image on some cute paper. Punch the stamped image out with your circle punch. I used Inspired Stamps 1 inch circle sentiments.
Step 2- Add adhesive to the entire back of the circle. I use the sticker maker to adhere my circles. 
***These 1 inch snowmen also go perfectly inside the bottle cap if you want to make these for Christmas. 
Step 3- Add Glossy Accents inside the entire bottle cap. Add in any embellishments you want. I put heart buttons in some of my caps. 
                                      
Step 4- Lay the bottle caps flat and leave alone for at least an hour. VERY IMPORTANT do not move them around while they are drying. 

Step 5- Add magnets to the back. I hot glue mine on the back. 
Step 6 -Decorate however you like. 

Here is a video that I made with instructions on how to make these step by step. My video camera is not making clear videos for some reason. I can not figure out why but you can get the steps anyways.
Don't forget to go to Inspired Stamps and check out all the other wonderful tutorials.

Inspired Stamps Christmas Cards

Scroll Down for the Blog-a-versy Hop
This week we were to make multiple cards that can be easily replicated.
So I made four cards using two different Inspired Stamps sets. The scripture stamp on the red part of the card is from New Christmas Verses and the circle stamps on the ornaments are from 1.5 inch Circle Christmas
The green paper is Me & My Big Ideas. I cut the ornaments using my Cricut Christmas Cheer cartridge. These were very simple to make and I love how they came out.

Check out what the other ladies came up with on the Inspired Stamps Blog.

Blog-a-versary Challenge Dazzling Diamonds

Once a month Crafty Card Gallery has a challenge for us to participate in. This month we were given Dazzling Diamond Self Adhesive  from www.thebuckleboutique.com 
This stuff is pretty amazing. It looking just like rhinestones but you can cut it in your die cutting machines or by hand. I cut the owl using my Cricut Create a Critter cartridge. 
The candy cane I cut on my Cricut but the rhinestones I hand cut and added to the cane. The sentiments are from Stampin Up and I used my spellbinders to cut the scallop circles. 
Make sure you head over to The Crafty Card Gallery and see the other Rhinestone Buckles projects.

Wednesday, November 28, 2012

MCCR Gift Packing


 Making your own gift bags is so easy and much more cost effective then buying store bought bags.
I bought a pack of bags with a coupon so 10 of them for $3. I used cute Christmas paper and a fun cut out. This tree is from Christmas Cheer cut at 4 inches. I added a super goofy face from Peachy Keen The Cornies. I added brads for the lights and used a white gel pen to add some details.
Head on over to My Cricut Craft Room and check out the rest of the projects for today.

Monday, November 26, 2012

Whimsy Stamps GDT

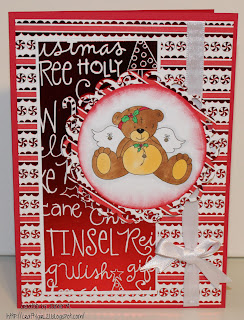
I saw this guest design spot contest from Whimsy Stamps and thought I have to go for it. They have some super cute stamps that I would love to work with and show off. So I made a new card for this call, which also follows their current challenge traditional Christmas colors. I am also going to share a couple of past projects with you.
 I used HollyBelle by StampArt Deisgn by Kathryne. This is the cutest bear. I colored it with Copics. 
I am a huge Meljen's fan so here is a couple projects I used her stamps on (Whimsy Stamps sells them).
Well wish me luck! Hope you enjoyed my card :)

Sunday, November 25, 2012

CCC #52 Paper Piercing

 This week on Christmas Cards Challenge is paper piercing. This is my last post as Guest Designer on CCC. I have loved my time and am thankful for the chance to participate. Now on to the card details.
This image is from The Stamping Boutique.  I colored it with Copics and added some stickles to it. I paper pierced around the image and at the top of my card. Cute paper and some twine and there you have it.

Now head on over to Christmas Card Challenge and link up your creations.
http://christmascardchallenges.blogspot.com/

Wednesday, November 21, 2012

TSB Thanksgiving Card

Here is my favorite girl Audrey in a cute pilgrim outfit. I colored her with Copics and inked around the edge of the image.
I always added Stickles around the images on the stars and dots around the image.
Head on over to The Stamping Boutique and join in on the Thanksgiving fun.

Tuesday, November 20, 2012

MCCR Thanksgiving Card

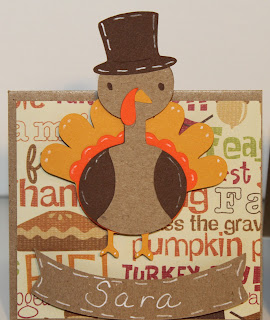
 I cut these cute turkeys from Create a Critter at 2 1/2 inches. The banners from Christmas Cheer at 1 in.

Head on over to My Cricut Craft Room and check out the rest of the projects for today.

Sunday, November 18, 2012

CCC #51 Double Embossing

The challenge for this week on Christmas Card Challenge is Double Embossing. You can interpret this in any way you'd like.  Some use dry and wet embossing together, while others use two different embossing folders on their projects.  Either way, it's totally cool to do either. I used two embossing folders on my card. 
I embossed the green scallop and red scallop. These super cute snowmen are from The Stamping Boutique. I colored them with copics and added Stickles. 
 This sentiment is from Stampin Up.
Head on over to CCC and join in on the fun! http://christmascardchallenges.blogspot.com/

Saturday, November 17, 2012

Foster Kids Birthday Partys Blog Hop

Banners for Foster Kids Birthday Partys Blog Hop
Hi! Welcome to Foster Kids Birthday Party's Blog Hop! Many of you may be familiar with CardMonkey's awesome banner hops for kids... I was so inspired by them that I wanted to find another opportunity to do good with my crafting. I happened upon a volunteer at Birthday Magic at a work event & followed up with them. They loved the idea of handmade birthday banners, so I put out the call and I was lucky to have 15 awesome crafters join me! So today you will get to see everyone's creations!

If you've never heard of Birthday Magic, you can see their site here -
http://www.volunteersac.org/birthdaymagic/
BirthdayMAGIC is a program of the Volunteer Center of Sacramento, which provides personalized monthly birthday parties to children currently living in Sacramento area homeless shelters, transitional living facilities, community programs or residential treatment centers.

The goal of BirthdayMAGIC is to brighten the lives of children by providing fun, meaningful and memorable birthday parties during what can be an awkward and challenging experience in their lives.

Each month, children living in these shelters will celebrate birthdays – through financial support, volunteer help and the BirthdayMAGIC program, these wonderful children will receive a birthday party thrown in their honor.

For more information on sponsoring a party please contact us at info@volunteersac.org or call (916) 567-3100.

I'm looking forward to dropping off all the amazing banners For them to use in the parties!

So now, sit back & enjoy all the great banners!!!

You should have started the hop at: Jennifer Restivo http://www.craftycardgallery.blogspot.com/ And if you've been following along, you should have come from: Madeleen Field


I used Recollections (I think) Monsters & Robots paper pack. The monsters are from Bump in the Night Cricut cartridge with Peachy Keen's monster faces on them. The words are cut from Celebrations.

Jamie Moore  ME
Tonia Williams www.twcards.blogspot.com/

Friday, November 16, 2012

MCCR Thanksgiving Recipes

 This is my favorite Thanksgiving recipe. Actually I make these several times a year.
We went to Ruth's Chris Steak House and I ordered the sweet potato casserole and fell in love. I asked the severer for the recipe and he said they gave it out around Christmas so my friend found it and gave it to me.
I used Create a Critter to make the pumpkin and used some cute paper to decorate the recipe.

You should try this recipe it is so good. Even my hubby that doesn't like sweet potatoes likes this one.
Here is the recipe though I found it need modified slightly to make it more like the resturant one....


Ruth's Chris Special Sweet Potato Casserole
Recipe By :Ruth's Chris

CRUST
1 cup brown sugar
1/3 cup flour
1 cup chopped nuts (pecans preferred)
1/3 stick butter – melted

SWEET POTATO MIXTURE
3 cups mashed sweet potatoes
1 cup sugar (I use ½ c)
1/2 teaspoon salt
1 teaspoon vanilla
2 eggs -- well beaten
1 stick butter -- ( 1/2 cup) melted (I use ¼ c)
Combine brown sugar, flour, nuts and butter in mixing bowl. Set aside.
Preheat oven to 350 degrees. Combine sweet potatoes, sugar, salt, vanilla, eggs and butter in a mixing bowl in the order listed. Mix thoroughly. Pour mixture into buttered baking dish. Sprinkle the surface of the sweet potato mixture evenly with the crust mixture. Bake for 30 minutes. Allow to set at least 30 minutes before serving.


Head on over to My Cricut Craft Room and check out the rest of the recipes.

Wednesday, November 14, 2012

Inspired Stamps Thankful Card

 I wanted to make a card that was a bit different from my ordinary style. I cut several circles using this festive paper and added those to a bright white card. Normally I don't leave any white but the circles with the pumpkins was perfect to me. I love when an idea comes together. I have been a little blah when it comes to making cards and sat and thought for just a few minutes and this one came to me. I guess God gave me a little inspiration :)
I used a wonderful fall set from Inspired Stamps called Fall Gratitude
Thanks for visiting me. Don't forget to check out all the wonderful inspiration going on over at Inspired Stamps and there is a sale!